Sunday 28 May 2017

Tutti Designs - Fancy Top Hat

Hello, my friends!

It's Monday, and I'm back with a new Tutti Designs share!

Today I'm sharing a New Release die called "Fancy Top Hat
which you can find HERE.

It was a happy little coincidence that I came across these papers the day before this die arrived.
Isn't it a great match? 
It makes up another fun masculine card:
perfect for Father's Day or a birthday.


I cut the die out of the paper, inked the edges, and adhered it with foam tape.
I added some masculine ribbon to the background paper, as well as the hat.
Finally, I added some bling. 


Here's a closer look at the die:


Other Materials Used:
Papers: Fancy Pants - Swagger Digital Collection;
Ink: Distress Ink - Walnut Stain;
Ribbon: Striped Grosgrain;
Bling: Crafts - Rhinestones.

Tutti Designs Dies Used:

Fancy Top Hat Die

* * * * *
I'll be back next week with a new project.
In the meantime, here are all the links you'll need:


Thursday 25 May 2017

Cards and More Shop Blog DT - It's Your Day!

Hello, my friends! 

I'm back with a new project made with products from the Cards and More Shop .

I made a fun little card!
First, I stamped and colored the lovely image from Tiddly Inks.
Then I decorated the card base using the Dutch Doobadoo stencil, 
and purple Distress Ink.
I cut two tags out of purple cardstock.
I stamped the sentiment on one of them,
layered them up, and added twine and a flower.


Here's a closer look at the sweet little tag:


These were the products used from the Cards and More Shop :

Tiddly Inks Stamp - Be My Sunshine


Jane's Doodles Stamp - Birthday Wishes


Dutch Doobadoo Stencil - Stripes and Dots


Distress Ink - Dusty Concord

Noor! Design Die - Tag No. 2


The Twinery Cord - Light Pastel Purple


* * * * *
Please pop on over to Cards and More Shop to see all the great products they carry.
Also, check out the Cards and More Shop blog.


It's full of fun inspirational projects! :o)

Have a happy day! :o)

Sunday 21 May 2017

Tutti Designs - Wedding Car?

Hello, my friends!

It's Monday, and I'm back with a new Tutti Designs share!

When is a Wedding Car just a car?
When you use the Wedding Car Die on a masculine card like this! 
You'll find it HERE.

I think I'll have to put this one away for my husband's birthday!
I really like this kraft and black patterned paper.
The back side is all kraft.
I cut the patterned piece to fit the black card base.
Then I centered the Stitched Oval Die on the back side, and cut it out.
I inked the edges and then adhered both pieces in place on the card front. 
I cut the Wedding Car from black cardstock and adhered it to the center of the oval.
Finally, I added two mini rhinestones to the weels, and three larger rhinestones in the corner. 


Here's a closer look at the fabulous die:


Other Materials Used:
Papers: Colorbok Craft Paper - Cosmopolitan;
Ink: Distress Ink - Walnut Stain;
Bling: Crafts - Rhinestones.

Tutti Designs Dies Used:


Stitched Nesting Ovals


* * * * *
I'll be back next week with a new project.
In the meantime, here are all the links you'll need:


Friday 19 May 2017

Mari Digis Digital Stamps at Miss Daisy Stamps - Dressmaker

Hello, my friends!

I have a new card to share with you today, 
using an image from Miss Daisy Stamps.

There's lots of exciting things happening at Miss Daisy Stamps...
...including lots of fun new additions to the shop!
You really need to head over and take a look.

Some of the fun new additions to the shop include

Mari Digis Digital Stamps


You'll find all the the Mari Digis available HERE.

For my card today, I used the lovely "Dressmaker" image.
You can find it right HERE.

Isn't she lovely? She was so much fun to play with.
I colored her up and then cut her out with pinking shears. 
After some simple layering, 
I dressed the card up with some sewing themed accessories.


It's funny that I didn't think to do some stitching until after it was all finished! lol


Here's a closer look:


Other Materials Used:
Papers: Recollections - Cardstock, Crate Paper - Close Knit;
Image: Mari Digis at Miss Daisy Stamps - Dressmaker;
Coloring: Spectrum Noir - Markers;
Dies: Spellbinders Shapeabilities - Sewing Elements;
Bling: Crafts - Mini Rhinestones;
Buttons: My Sewing Stash;
Pinking Shears.

* * * * *
Thanks for stopping by today!
Happy Weekend to you all! :o)

* * * * *
Here are all the links:


Kathryne is very generous with gifts and surprises.
You'll want to sign up so you don't miss any of the fun!

Monday 15 May 2017

All Dressed Up - Challenge #69

Hello, my friends!

Today is the beginning of a new challenge at All Dressed Up!
The challenges are always Anything Goes but you MUST use an image from All Dressed Up.
There are freebies available at the challenge blog HERE! :o)

I have used the beautiful "Flower Fairy" image on my card.
You can find it HERE.

Here is my card!


After coloring the image, I framed it with the die.
Then I added Stickles to make it sparkle. 


Materials Used:
Papers: White Card Base, Unknown Green Print;
Image: All Dressed Up - Flower Fairy;
Color: Spectrum Noir Markers;
Dies: Spellbinders Nestabilities - Romantic Rectangles Two;
Bling: Crafts - Glittering Stickers;
Stickles: Frosted Lace, Star Dust.

* * * * *
Head on over to the Challenge Blog and join the fun! :o)

* * * * *
Here are all the links you'll need:


Sunday 14 May 2017

Tutti Designs - Let's Celebrate

Hello, my friends!

It's Monday, and I'm back with a new Tutti Designs share!

These week I am combining three great dies to make this fun card.
I wanted to feature the fantastic Party Banner Die.
The Stitched Ovals and Stitched Rectangles helped me show it off.

Just some pretty papers, some quick die-cutting, and some simple layering, 
and this fun birthday card is finished.
Isn't it fun?


I added a slight curl to the tips of the banner to add some dimension.


To finish it off I added two little ribbon embellishments.


Other Materials Used:
Papers: Authentique - Wishes Collection;
Stamp: Simon Says Stamp - Birthday Bits;
Ink: Memento - Tuxedo Black;
Ribbons - My Sewing Stash.


Tutti Designs Dies:


Stitched Nesting Ovals


Stitched Nesting Rectangles


* * * * *
I'll be back next week with a new project.
In the meantime, here are all the links you'll need:


Mustard Seed Faith Challenge - God's Lullabies To Us

Sunday Blessings to you, my friends!

It's time for a new challenge over at Mustard Seed Faith Challenge Blog

The theme this week is "The Psalms as God's Lullabies To Us". 
Peggysue has a short devotional on the subject over on the blog.

I really love that as a description of the Psalms! 
Are you familiar with the Psalms? 
I think Psalm 23 is probably the most well known
but I love them all. 
Several years ago I had to have a major surgery and I was really scared. 
I pulled out my Bible and started reading the Psalms.
It really was a lullaby for me...and calmed all my fears.
I was able to face my surgery with peace.

If you're ever scared, or worried, or feeling alone...
...or if you're just feeling overwhelmed with life and the world today...
...just dig into the Psalms! 
Feel God speaking the Lullaby to you! 

For the challenge this week:

Create a Baby Card / Something With a Psalm as a Lullaby

I used some lovely items from Gecko Galz to create my card.


The image has a little mustard colored bird on it,
just for my friend Annabel! :o)


Materials Used:
Image: Gecko Galz - Baby Mine Digital Collage Set;
Bling: Crafts - Mini Rhinestones;
Seam Binding: My Sewing Stash;
Doily: My Stash.


* * * * * 
So head on over to the

There you can meet the rest of the Design Team
and see what they've created for the challenge this week. 

Then check out the simple rules, make something,
and link it up!

I can't wait to see what you make! :o)

Saturday 13 May 2017

Just A Little Announcement

Hello, my friends!

I'm just popping in with a fun little announcement post!

I'm thrilled to tell you that I have been invited to the Guest Design Team at Swedish House Crafts


If you've never heard of Swedish House Crafts...
it's a fantastic little online shop located in the UK.
However, items can be shipped anywhere!
Suha is the owner, and she's absolutely fabulous!

My first Design Team share will be in July!
I'm really excited to be sharing a few fun projects with you over the next year!
I'm also very happy to be working with a team full of really incredible talent!

Head on over and check it all out!

Swedish House Crafts Shop

Swedish House Craftlog

Meet the Entire Design Team


Friday 12 May 2017

FabScraps - My Fair Lady Collection - The Joy of Life Card

Hello, my sweet friends!

I'm so excited to be sharing my first FabScraps DT project with you! 
I have to tell you that these FabScraps goodies are fantastic!
The collections are GORGEOUS and all the pieces work so beautifully together! 

Here is the card I made:


Here is how I did it:
My Fair Lady Collection
The Joy of Life Card
Nancy Nickel

For this project you will need:

  •        FabScraps My Fair Lady Collection paper range: C94 003
  •        FabScraps My Peel Off Stickers ST94 002
  •        FabScraps Carder’s Pack MC94 001A 0 – Perfume Bottle
  •        Dark Green Cardstock, Scrap of White Cardstock
  •        Decorative Die (Spellbinders Nestabilities – Labels 47)
  •        Peach Coloured Satin Ribbon (Offray Picot Edge)
  •        Ink: Brown (Distress Ink – Walnut Stain)
  •        Pearls

Instructions:

  1.     Choose card base (6 ½” X 5”).
  2.     Cover card front with cardstock.
  3.     Cut background from 003 (6 ¼” X 4 ¾”) and ink edges. Adhere to card.
  4.     Die-cut decorative frame from green cardstock. Any die that frames the image will work. Adhere this to card.
  5.     Cut pretty image from other side of 003. Fit it into frame and adhere.
  6.     Choose “The Joy of Life” Sticker, and adhere it onto white cardstock. Fussy cut it out.
  7.     Choose perfume bottle die-cut from Carder’s Kit. Cut in half horizontally. Adhere to top and bottom of back of sticker, as shown in photo. Ink edges. Add it to card using foam tape.
  8.     Add loopy ribbon bow to top left corner of card, and a mini bow to neck of perfume bottle.
  9.     Finally, add pearls wherever you would like.
 * * * * *

Here are all the links:


Wednesday 10 May 2017

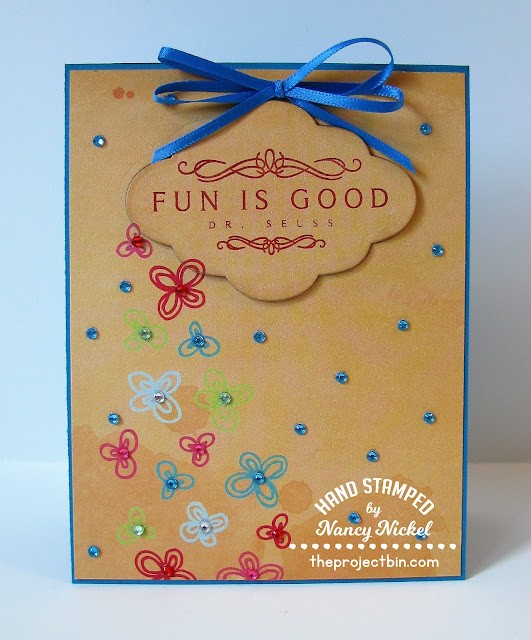
The Project Bin - More Fun is Good

Happy Wednesday, my friends!

Today I'm back with another project for The Project Bin!

I'm having some more fun with the Fun Is Good Stamp Set.
You can find it HERE.

I stamped the sentiment on this whimsical paper.
Then I die-cut it out.
I matted the paper on blue cardstock,
and adhered it to a white card base. 
Then I added the sentiment back in place using foam tape.


It doesn't show that much in the photo 
but the blue shows up as a bit of a frame around the quote.
To finish it off, I added a ribbon bow and a scattering of mini rhinestones.


Here's a closer look at the stamped sentiment:


Other Materials Used:
Papers: Reccollections - Cardstock, American Crafts - Color Crush;
Dies: Spellbinders Nestabilities - Labels Six;
Bling: Crafts - Mini Rhinestones;
Ink: Stampin' Up - Real Red;
Ribbon: Offray.

From The Project Bin:


* * * * *

If you're not familiar with The Project Bin,
they specialize in wonderful sentiment stamps.
They're clear photopolymer and stamp as crisp as can be!
Each set has multiple stamps, and 
"A Way With Words."


* * * * *
I'll be back next week to share another wonderful stamp! :o)
In the meantime...

Here are all the links you'll need:


Blog Archive